 Steel. I initially bought 3/4" square tubing,
but mindful of Rott-bot's weight problems, I used 1/2"
tubing instead, with a 1/16" wall. I cut up the
tubing with a miter saw, and took it to a friend who welds.
One day of welding later, and I had a frame that weighed only
ten pounds that I could stand on.
Steel. I initially bought 3/4" square tubing,
but mindful of Rott-bot's weight problems, I used 1/2"
tubing instead, with a 1/16" wall. I cut up the
tubing with a miter saw, and took it to a friend who welds.
One day of welding later, and I had a frame that weighed only
ten pounds that I could stand on.
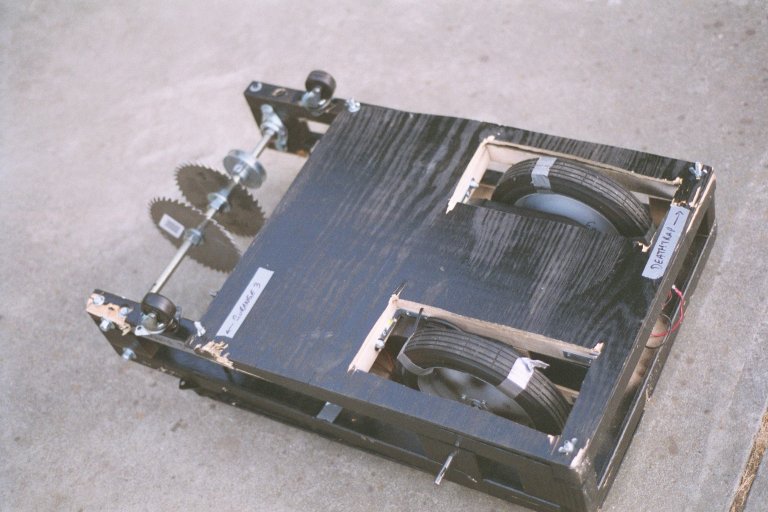
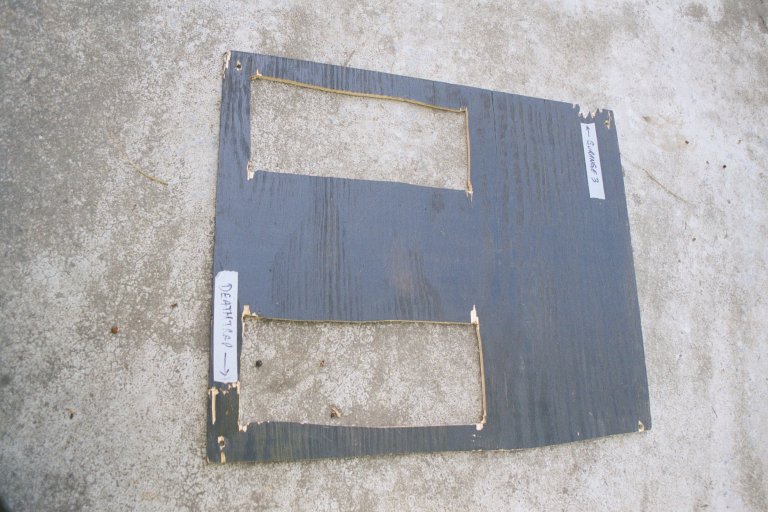 Rott-bot wasn't exactly armored, but it did have a plywood
skin roughly cut to shape and bolted on. The piece in this picture
is post-Long Beach, and the labels indicate the robot responsible
for inflicting it.
Rott-bot wasn't exactly armored, but it did have a plywood
skin roughly cut to shape and bolted on. The piece in this picture
is post-Long Beach, and the labels indicate the robot responsible
for inflicting it.
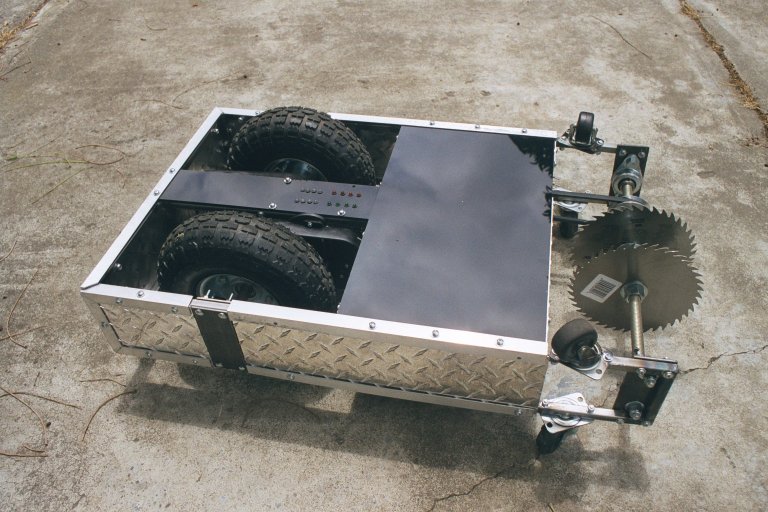
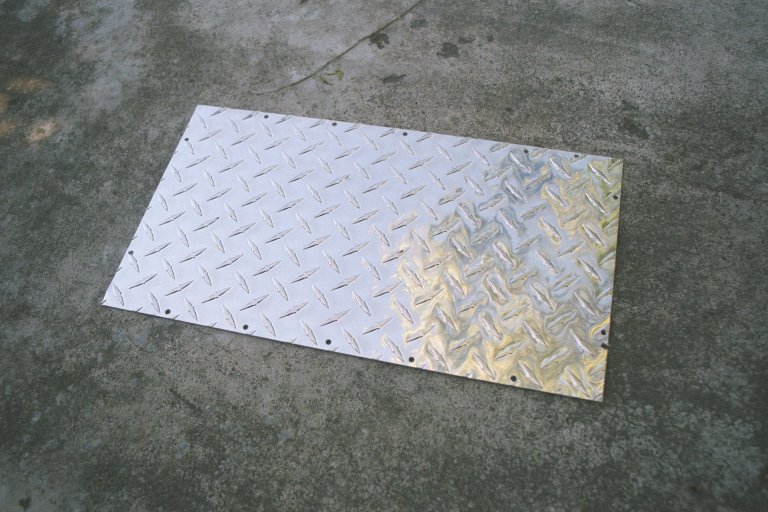 Rott-bot 2000 has 1/16" aluminum tread plate on the bottom
and sides, and 1/4" acrylic (not polycarbonate!) on the top.
This is the belly plate, the largest piece.
Rott-bot 2000 has 1/16" aluminum tread plate on the bottom
and sides, and 1/4" acrylic (not polycarbonate!) on the top.
This is the belly plate, the largest piece.
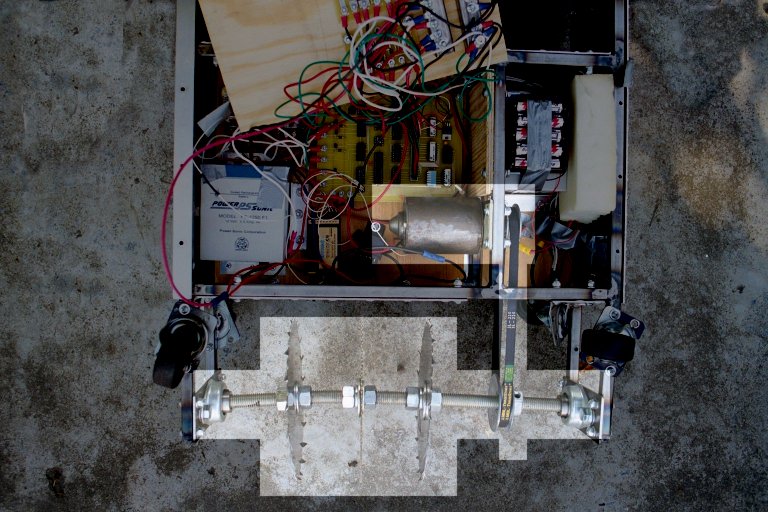 Rott-bot 2000 uses a smaller, lighter motor for driving the saw
blades, and can afford the weight of it.
Rott-bot 2000 uses a smaller, lighter motor for driving the saw
blades, and can afford the weight of it.
 Since I'm interested in electronics, I built my own speed controller.
It's based on a PIC 16C63 microcontroller, and takes two channels of
joystick information and turns it into two-wheel PWM.
Since I'm interested in electronics, I built my own speed controller.
It's based on a PIC 16C63 microcontroller, and takes two channels of
joystick information and turns it into two-wheel PWM.
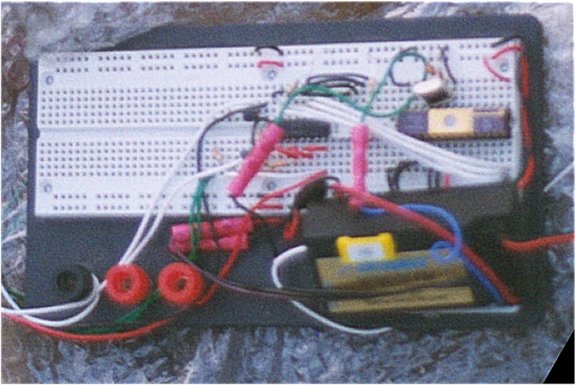
Due to poor time management, I didn't get the controller past the prototype stage, and I ended up stuffing a breadboard into the robot. It's a miracle nothing was shaken loose.
I also couldn't get a four-FET H-bridge working in time, so direction control is done with a DPDT relay, and the speed control happens with a single FET on the ground leg.
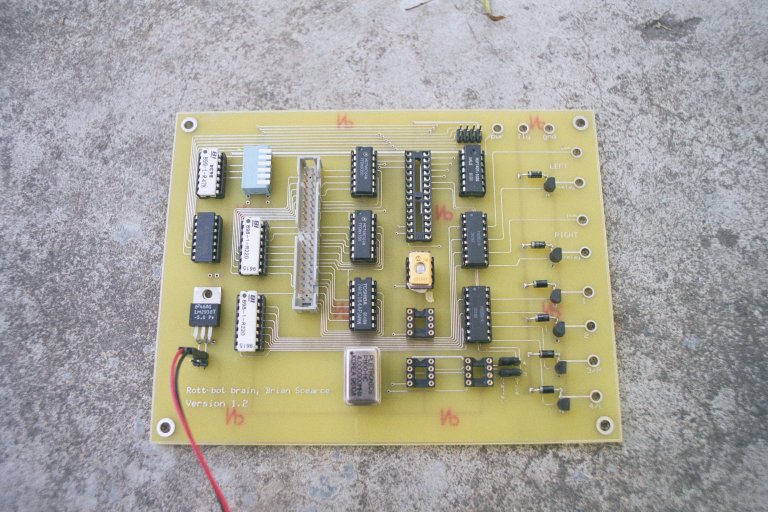 I'm still using the home-brew speed controller, with a few
improvements: the PWM rate for the motors has been doubled to
60Hz, the control circuitry has been fixed so that the FET is
turned off while the relay is switching to prevent arcing, and
I've had a very nice PCB made. I didn't even bother to try
to eliminate the relays, they worked just fine.
I'm still using the home-brew speed controller, with a few
improvements: the PWM rate for the motors has been doubled to
60Hz, the control circuitry has been fixed so that the FET is
turned off while the relay is switching to prevent arcing, and
I've had a very nice PCB made. I didn't even bother to try
to eliminate the relays, they worked just fine.
And the speed controller software is now also capable of blinking some LEDs.
As in Rott-bot, the power electronics are optoisolated from the logic electronics.
I also used an ordinary 4-cell pack of NiCds to run the electronics and the radio receiver, and a 10-cell pack of rechargeable alkalines to act as a gate drive for the FETs on the motor drive.
 Almost the same -- I'm using two lead-acid batteries, but when
I went to the battery store to get spares, I found that the
technology has advanced to the point where a battery of the same
size has a capacity of 5Ah, not 4. I have two of these batteries
wired in parallel (so 12V, 10Ah capacity) for running both the
saw and the drive. This is enough for a five-minute match, even
with spirited driving and moderately heavy use of the saw.
Almost the same -- I'm using two lead-acid batteries, but when
I went to the battery store to get spares, I found that the
technology has advanced to the point where a battery of the same
size has a capacity of 5Ah, not 4. I have two of these batteries
wired in parallel (so 12V, 10Ah capacity) for running both the
saw and the drive. This is enough for a five-minute match, even
with spirited driving and moderately heavy use of the saw.
I had hoped to eliminate the 15V alkaline pack, but, for reasons I haven't yet figured out, my FET driver wouldn't work without it. And the logic now runs from a 9V battery run through a voltage regulator.
The motors mostly survived, but with my crazy driving, the metal pinion on the motor tore teeth off of the first nylon gear in the gearbox.
My main problem was in using hard plastic wheels, even worse than lawnmower wheels, that didn't get much traction. I could see the wheels spinning in the arena. I tried scoring the plastic with a file, but it didn't help much.
You'll also note on the main picture that Rott-bot's axle isn't held in by anything except friction. In practice, I had to drift it out with a hammer and another length of drill rod, so I wasn't too worried that it would be knocked out in combat.
The axle is held in place by being sandwiched between 1/8" plates of steel.
Radio receivers normally have some susceptibility to noise, but this seemed excessive.
I was pleased that my first attempt at building a robot survived its two rounds against seasoned competitors.
Rott-bot was twitching madly during the Kilobot Rumble, so I was (properly) asked by the safety people to remove it from the ring.
- Wheels: hard plastic wheels that didn't grip. The most significant flaw by far.
- Gearboxes: delicate teeth shorn off by spirited driving.
- Radio gear: too vulnerable to electrical noise. The organizers warned against using FM, but would I listen?
- Armor: plywood is weak and heavy, and the sides of Rott-bot were completely unarmored. If the arena spikes had been slightly higher, I'd have done even worse.
- Weight: using heavy wood and not measuring carefully enough resulted in a quick frame rebuild, and a non-working saw motor.
- Technique: Rott-bot was still not running when I loaded the carcase into my car for the drive to Long Beach. The first time I drove it was in my first match. You can imagine that my control was not perfect.
- Appearance: ugliest robot at the event.
- Gearboxes: geared too low (I had great torque, but a top speed of only about 2 MPH), and they're fairly delicate... sudden direction changes can tear teeth off of the plastic gears.
- Speed controller: should have soldered the integrated circuits directly to the printed-circuit board rather than using sockets, or failing that should have glued them into the sockets. Also, the speed controller was uncovered, so any conductive debris that got inside the body (and there was a big slot where the saw drive belt came out) could easily short out the speed controller. It should have been wrapped in something, or maybe dipped in plastic.
- Armor: delicate brittle acrylic for the lid. Next time I splurge on polycarbonate.
- Casters: held on by two #8 (4mm diameter) bolts, and a good side hit can shear them off. I should have welded some plate steel horizontally further inboard, and used four bolts to hold the casters to that.
- Recharge time: I should have had semi-exposed power studs so I can recharge the main batteries without opening it up. I should have had a bigger recharger. I maybe should switch to nickel-cadmium batteries rather than lead-acid, still investigating that.
- Construction: the whole thing should have been easier to open and close. I had too much "layering", so that to (say) remove the speed controller circuit board I had to remove the lid and the front plates in order to get a wrench onto the nuts holding the belly plate, and then remove the belly plate to get at the nuts holding the circuit board to a piece of wood inside. Should have used more tapped holes and fewer nuts. Also, not enough room in the electronics compartment. I wanted to add a car horn as a gag (probably would have been inaudible anyway), but I ran out of room.
- Weapon: A 5/8" piece of threaded rod that is essentially being used for a battering ram should be supported at more than just the ends.
- Technique: I'm a terrible driver, should have practiced more.
- Appearance: Fit and finish on the armor... the front plates were added last, and they look terrible.
- Achilles Heel: Power switches are exposed at the front, and a well-aimed hit could have simply turned the machine off. What I really wanted was those switches they have in military and space equipment, with the switch flanked by two semi-circular pieces of metal, but I couldn't find any at the surplus stores.
| Item | Cost | Source |
|---|---|---|
| Radio Gear (Airtronics VG4R FM, new) | $150 | Sheldon's Hobbies |
| Wood for frame and armor | $50 | Local hardware store (OSH) |
| Electronics (PIC microcontroller, MOSFETs, transistors, relays) | $100 | Digi-Key, Jameco and JDR. The last two are local to me, but all three do mailorder. |
| Miscellaneous hardware (nuts, bolts, washers, casters) | $60 | Local hardware store (Dale) |
| Weapon (threaded rod, nuts, washers, pillow blocks, saw blades) | $60 (mostly for the pillow blocks) |
Local hardware store (Dale) |
| Batteries (two 4Ah lead-acid, one 4.8V NiCd, ten rechargeable AA alkalines) | $120 (including rechargers) | Lead-acid: local electronics store (HdB in Redwood City); NiCd: came with radio gear; AAs and rechargers: local computer/electronics store (Fry's) |
| Wheels, gearboxes and motors | $40 | Wheels: local hardware store (Dale); gearboxes and motors: C&H Surplus |
| Total | $580 | my bank account |
Keep in mind too that a fair bit of the stuff, like the battery rechargers and the radio transmitter, is not in the arena and is not at risk.
In addition to the material actually used in the robot, I had tools like a decent Wintel computer ($1500), a PICstart Plus programmer for burning the microcontroller ($200), a small drill press ($150), a Makita chop-saw for nice square cuts ($150), a hand-held Skil-Saw ($75) and a cordless hand drill ($75).
| Item | Cost | Source |
|---|---|---|
| Radio Gear (Airtronics PCM, used) | $150 | eBay |
| Steel for frame | $30 | Local hardware store (Dale) |
| Tread plate aluminum for armor, aluminum angle for corners | $60 | Local hardware store (Dale) |
| Acrylic lid | $20 | TAP Plastics, a west-cost plastic shop |
| Electronics (PIC microcontroller, MOSFETs, transistors, relays, LEDs) | $100 | Digi-Key, Jameco and JDR. The last two are local to me, but all three do mailorder. |
| Printed circuit board fab | $150 | ExpressPCB. They only make boards in pairs, so the $150 was actually for two boards. |
| Miscellaneous hardware (nuts, bolts, washers, casters) | $60 | Local hardware store (Dale) |
| Weapon hardware (threaded rod, nuts, washers, pillow blocks, saw blades) | $60 (mostly for the pillow blocks) |
Local hardware store (Dale) (actually scavenged from Rott-bot, so real cost was $0) |
| Weapon motor | $15 | Surplus, not sure which store |
| Batteries (two 5Ah lead-acid, ten rechargeable AA alkalines) | $120 (including rechargers) |
Lead-acid: local electronics store (HdB in Redwood City); AAs and rechargers: local computer/electronics store (Fry's) |
| Wheels | $20 | Harbor Freight |
| Gearboxes and motors | $20 | C&H Surplus |
| Total | $805 | my bank account |
Again, some of these parts are not at risk from combat, and most of them survived anyway.
I had all the shop equipment I used in Rott-bot, plus I bought a small tablesaw ($150), and a grinder ($60). I used the chop saw for cutting the steel frame members, probably shortening its life. I didn't have to spend $2000 on a TIG welder, because I have a friend who has one, but I may be buying myself a small MIG for future work.
With both Rott-bot and Rott-bot 2000, my actual costs were higher, due to false starts and purchases of spare parts.